top of page

Winter Fun!
All my work on the projects include slides full of context, research and planning; as well as a collection of images of my process and production. Here is the work I had done on my Animation project! One of my favourite projects that I have done so far.


My Slides

Context
&
Research
To start off the project, I started thinking about the emotion I wanted my short animation to convey, and aesthetic/vibe I wanted it to have. I did think by looking at some of my favourite animated shorts/shows and made a mood board. Then I started brainstorming my own ideas for a short animation, based on the aesthetic and emotion that I had thought of previously. I also planned ahead and created a Gantt chart that would help with my scheduling, and how I would go about the production of my animation.

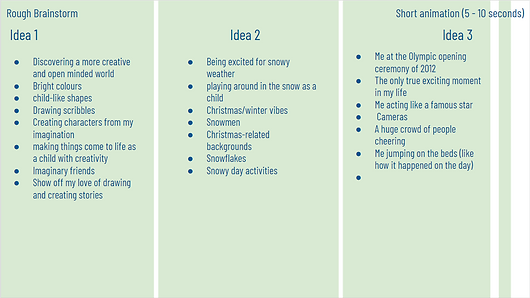
From my context I had chosen my final animation idea. Thus, to prepare myself with making my animation I made myself familiar with other short animated films. Whether the animation had a big story behind it, or if it was just to show off the creators animating skills, I noted down all the ones I liked and wrote about the features that stood out to me. When I was writing about the short film Afternoon Class, I pointed out the really compelling animated scenes where the things that happened had its own symbolism. And with a short film that didn't have any words being said, that animation did well the tell the viewer what was going on. This is something I wanted to show in my own animation as well; through the actions and scenery of my animation I wanted the emotion of joy to be apparent.
Also, as a part of my research, I looked into animation tips and tutorials that could help me with the production. Things like how to operate Adobe Animate (seeing as that was the software I was planning on using), The different camera movements and angles, and how the face can convey different emotions.


Planning
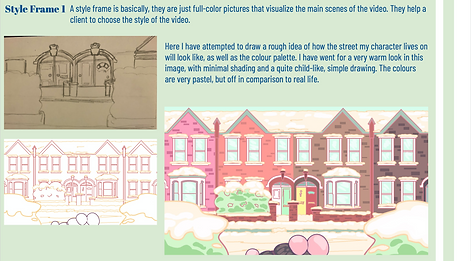


From my research I started to better plan out my animations frames and style. I started with a short description of what I wanted each scene to be, along with the audio timestamps. With that I could go onto creating my storyboard drawings but, before starting that I had to make my style frame. I came up with 2 style frames, and I feel like the design I chose better represents the colourfulness and wonder I was trying to capture. I also happened to make a character sheet to help me keep the same design of my character. It was inspired by some of my favourite animated shows and I feel like the childishness really complements the aesthetic.
Finally, I started my storyboarding. Because I had written what I wanted to happen in my animation, it ws easy for me to imagine the drawings and actions that would be happening. My storyboard ended up being very accurate to the actual product. I also ended up having the storyboard coloured.
Production Log
Because of my planning, the production of my animation went quite smoothly. All I really had to do was follow along with my storyboards and animate the actions planned. I first drew up rough body animations of my character, and used that as an outline. I then drew the secondary features like the clothes and facial expressions. And finally I smoothed the line art and applied colour.
For the backgrounds the process was sort of similar. I had drawn up a rough sketch of the backgrounds along side some of the animation frames so everything lined up okay. Then I got to drawing the line art and applying colour, making sure the style was accurate by looking at my style frame.
At first I was going to use Adobe Animate completely seeing as I had spent some time learning it, but I ended up only using it to sync up my audio, to line art my rough animation, and for the camera movements. Adobe Animate was really useful when it came to having to rotate the camera and the tracking shot.


Evaluation
The final thing I did for this project was an Evaluation on all the work I had done. This included my honest thoughts about my work and my final product.

My Slides
To get access to my google presentations on my context, research, planning, production log and evaluations please click on the image below! On the website below you can find all my year 12 work in better detail:
bottom of page